
9 Top Fishing Spots Under 20km From Swansea Heads
Part 1 covered everything inside 11 km. This lot runs from 11.6 to 19.1 km, and the character of the fishing changes with it. The close-in gravel gives way to two very different things: a run of terraced reef north toward Dudley that holds mulloway, and a set of deeper, harder grounds south toward Norah Head that hold snapper and kings.
Distances below are measured, not copied. Positions come from the Marine Rescue Lake Macquarie fishing matrix, cross-checked against Navionics chart data, which is also the source for the depths and seabed detail. The matrix’s own distance column contains errors in this stretch of up to twelve kilometres. Every distance here has been recalculated from the coordinates. Where Navionics shows nothing at a position, the entry says so.
A warning about this section of the list
Four fishing marks in this range are published with distances that are simply wrong. Farm Catherine Hill Bay 3 is listed at 6.4 km and actually sits at 18.4 km. Farm Inner is listed at 18.0 and is 12.9. Farm No 1 is listed 18.0 and is 15.9. Farm No 3 is listed 12.9 and is 16.0. Anyone planning fuel or a weather window off that column will be badly caught out.
The Farm grounds are not covered here — eleven sets of numbers spread across one ground 8 km wide deserves its own article, and it will get one.
Quick reference
Distances from Swansea Heads, recalculated from the coordinates because the published column contains errors in this range. Depths charted to lowest astronomical tide.
| # | Mark | Position | From Heads | Offshore | Depth | Bottom | Main species |
|---|---|---|---|---|---|---|---|
| 9 | The Pot Hole | 33° 04.85′ / 151° 47.15′ | 11.6 km | 9.0 km | 80–100 m | Gravel basin, depressions | Snapper, trag, kings |
| 10 | The Jewhole | 33° 00.50′ / 151° 44.85′ | 12.3 km | 1.5 km | 27 m | Fractured hard reef | Mulloway, snapper |
| 11 | Tom’s Mark | 32° 59.64′ / 151° 45.23′ | 14.0 km | 1.9 km | 20–30 m* | Gravel over sand* | Snapper, flathead |
| 12 | Red Ochre | 33° 12.80′ / 151° 36.90′ | 14.1 km | 0.7 km | 15–20 m* | Inshore reef* | Snapper, morwong |
| 13 | Pogonoski & Dudley | 32° 58.36′ / 151° 45.09′ | 15.8 km | 1.1 km | 24–30 m | Gravelly sand, rubble | Snapper, flathead |
| 14 | Doctor’s Reef | 33° 14.30′ / 151° 39.50′ | 16.2 km | 5.2 km | 20–25 m | High-relief rock | Snapper, kings, mulloway |
| 15 | Bird Island East | 33° 13.92′ / 151° 36.28′ | 16.4 km | 1.6 km | 10–18 m | Broken reef, pinnacles | Snapper, trevally |
| 16 | The Steps | 32° 57.52′ / 151° 45.58′ | 17.5 km | 0.5 km | 25–30 m | Terraced rock ledges | Snapper, mulloway |
| 17 | The Perch Grounds | 33° 14.50′ / 151° 44.50′ | 18.1 km | 11.6 km | 55–65 m | Deep broken reef | Ocean perch, nannygai, kings |
| 18 | Middle Reef | 33° 15.60′ / 151° 42.60′ | 19.1 km | 10.2 km | 45–52 m | Deep rock ridge | Snapper, trag, nannygai |
* Not charted — estimated from surrounding ground. Sound before you commit.
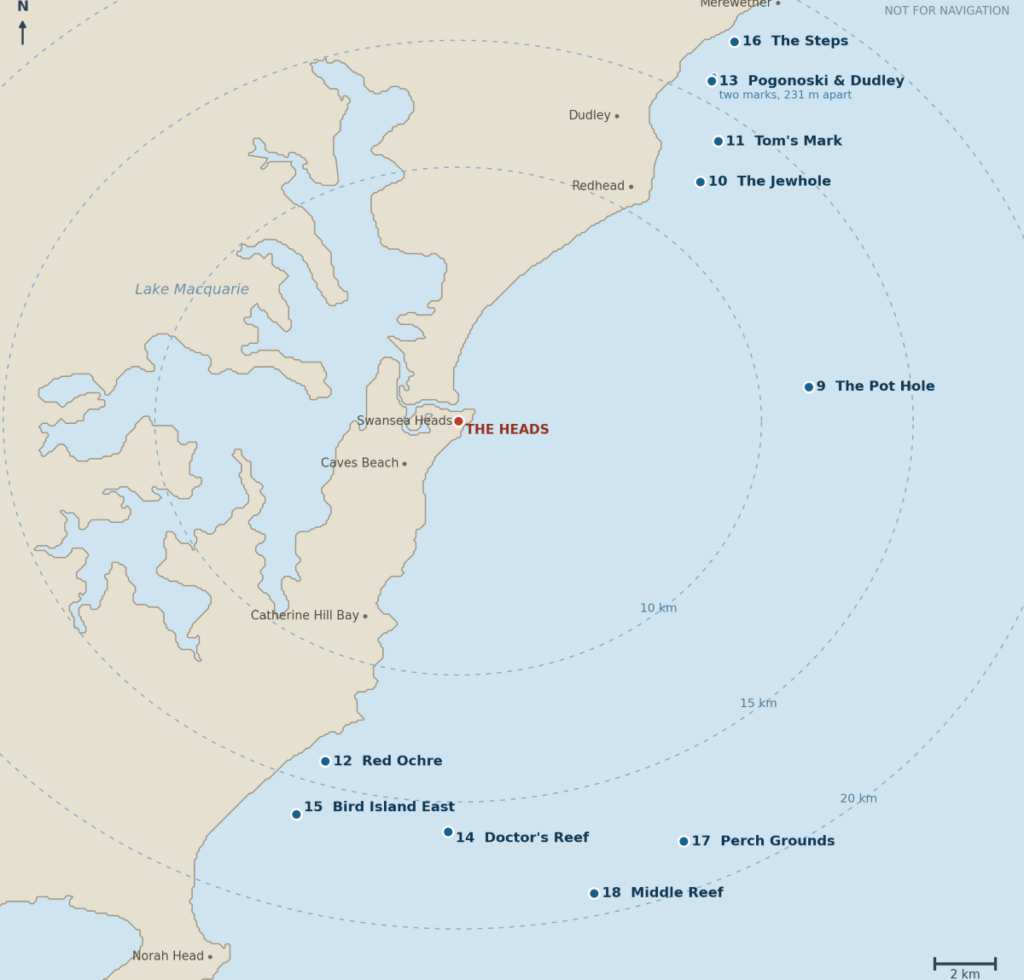
The marks on a map
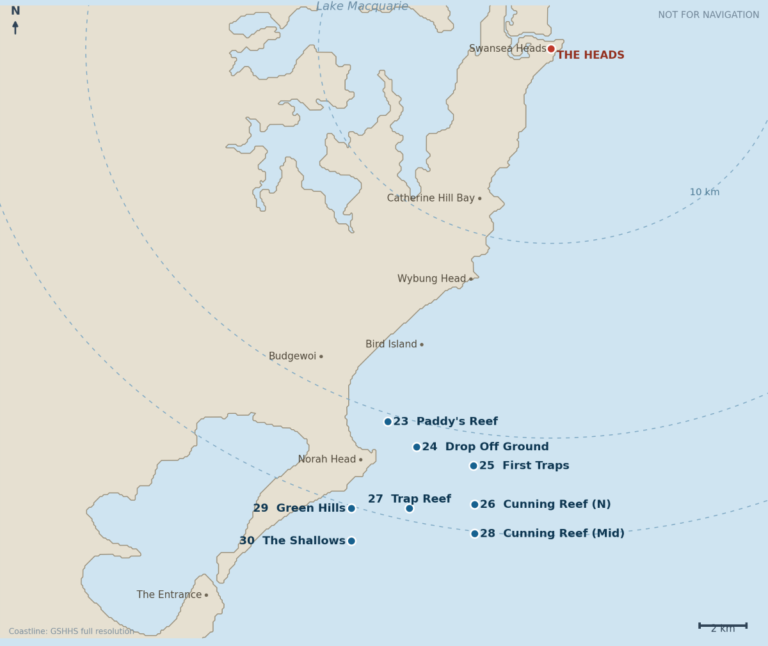
Rings are 10, 15 and 20 km from the Heads. The spread is the point: the northern marks off Dudley and Merewether are a long run up the coast but sit within a kilometre or two of the beach, while the Pot Hole, the Perch Grounds and Middle Reef are genuine wide water.
9. The Pot Hole — 11.6 km
33° 04.85′ S, 151° 47.15′ E · 11.6 km from the Heads · 9.0 km offshore · 80–100 m charted
The deepest mark in this article and the deepest so far in the series by a wide margin. That depth is the whole story: at nine kilometres out, the shelf off this coast is generally running 50 to 70 m, so 80 to 100 m here is a genuine anomaly. It is, in other words, a hole — which is presumably exactly how it got the name.
The ground is a transition zone rather than a reef. Isolated gravel patches, broken shell beds and gritty sand pockets, punctuated by sudden localised depressions and low-relief rocky undulations. There is no wall of high-rising reef here. What you have is a grit-and-gravel basin whose small drops and gravelly edges catch the current, trap nutrients and hold bait, which in turn holds the predators.
Target species: Premium snapper, teraglin (trag) and big tiger flathead on the bottom, with morwong deeper on the drifts. Because of the depth and the distance offshore, pelagics pass through: yellowtail kingfish, silver trevally, and mahi mahi or tuna when the East Australian Current pushes warm water close to the coast.
Baits and rigs: This is real deep-water work. Enough lead to hold bottom in current, heavy paternoster rigs, fresh squid and fish baits. Slow-pitch and knife jigs are effective if you have the gear for the depth. Fish the drifts across the depressions rather than sitting on one spot — the edges are where the feeding happens.
Best time: Winter and early spring for snapper and trag. Summer through autumn for the pelagic run, particularly when the sea surface charts show a warm push inshore.
Worth knowing: at 80–100 m, barotrauma is a serious issue for released fish. If you’re returning undersized snapper or trag from this depth, a release weight is close to essential — without one, most of what you put back will not survive.
10. The Jewhole — 12.3 km
33° 00.50′ S, 151° 44.85′ E · 12.3 km from the Heads · 1.5 km offshore · 20–30 m charted (27 m)
The name is the instruction. This is a mulloway mark first and everything else second.
The bottom is fractured hard rock and gravel, and it stands out because the ground around it is flat sand. Low to medium relief with ledges, cracks and rubble patches that trap organic matter and hold bait. It is an abrupt piece of structure on an otherwise featureless plain, which is precisely why fish travelling this coast stop at it.
Target species: Mulloway are the primary target, holding around the deep rock ledges and gravel edges. Snapper are plentiful across the hard bottom, particularly through winter and spring when the bigger reds move into the shallower reef. Kingfish work the upper water column over the structure. Teraglin and silver trevally come on the drops.
Baits and rigs: For mulloway, live bait or big fresh baits — squid, tailor fillet, whole yellowtail — fished hard on the bottom against the ledges. For snapper, unweighted or lightly weighted baits down a berley trail. Drifting or anchoring with weighted rigs directly over the structural drops covers both.
Best time: Mulloway fish best at night, at dawn and dusk, and around the slack tide change — all three matter more here than the season does. Snapper through winter and spring. Kings in the warmer months.
Worth knowing: mulloway are 70 cm minimum in NSW with a bag limit of 2 and a boat limit of 2 per day. That boat limit catches people out — four anglers aboard does not mean eight fish.
11. Tom’s Mark — 14.0 km
32° 59.64′ S, 151° 45.23′ E · 14.0 km from the Heads · 1.9 km offshore · est. 20–30 m
This one comes with a caveat: nothing charts here. The position doesn’t return a fishing mark on Navionics, and the depth above is an estimate from the surrounding shelf rather than a charted reading. That doesn’t mean there’s nothing there — plenty of good marks are personal numbers that never made it onto a chart, and the fact that someone’s name is attached suggests exactly that. But go with a sounder and low expectations rather than treating it as a known quantity.
It sits in the run of ground between the Jewhole and the Dudley marks, on the inner shelf about two kilometres off the beach, and the bottom in that band is broadly gravel and low reef patches over sand.
Target species: On the evidence of the surrounding marks — snapper, sand and tiger flathead, silver trevally, morwong.
Baits and rigs: Paternoster with squid and pilchard while you’re prospecting. If you find structure, switch to lightly weighted baits down a berley trail.
Best time: Autumn and winter, in line with the rest of this stretch.
12. Red Ochre — 14.1 km
33° 12.80′ S, 151° 36.90′ E · 14.1 km from the Heads · 0.7 km offshore · est. 15–20 m
Same caveat as Tom’s Mark — nothing shows on the chart at this position, and the depth is an estimate.
Note how close in it is. At 700 metres off the beach south of Catherine Hill Bay, this is a small-boat mark in shallow water on an exposed stretch of coast. It is a fine option on a flat day and a poor idea in swell.
Target species: Inshore reef species — snapper and squire, morwong, bream, silver trevally, tailor and salmon in season.
Baits and rigs: Light gear and berley, as with any shallow inshore reef. Prawns, squid strips, pilchard.
Best time: Winter for snapper. Needs an offshore breeze and low swell.
13. Pogonoski and Dudley — 15.8 to 16.0 km
32° 58.36′ S, 151° 45.09′ E (Pogonoski)
32° 58.24′ S, 151° 45.14′ E (Dudley)
15.8–16.0 km from the Heads · 1.1 km offshore · 24–30 m charted
These two marks are 231 metres apart. That is closer than a single drift. They are not two grounds; they are one piece of bottom with two sets of numbers on it, recorded by different boats at different times, exactly like Surf Club Gravel and Redhead Pinnacle in part 1. Fish them as one session. Dudley reads a touch deeper at 25–30 m against Pogonoski’s 24–28 m, which is simply the inner shelf continuing its gentle slope seaward.
The bottom across both is a firm sand and shell-grit base broken by small low-lying rocky outcrops, gravel beds and scattered rock rubble. It is a clean, drift-friendly bottom — enough structural texture to hold bait and benthic life, not enough to cost you a rig every drop.
Both sit a few kilometres south of the Hunter River mouth, and with the prevailing current setting south along this coast, they receive the nutrient plume coming out of the harbour. That is the practical reason this stretch holds so much bait.
Target species: Snapper is the headline — squire and pan-sized fish in numbers across the gravel patches, best at dawn and dusk and through winter when they push inshore. Sand and tiger flathead along the sandy fringes around the rubble. School whiting over the cleaner sand at Dudley. Silver trevally and morwong over the harder gravel. Mulloway patrol at night, tracking bait moving in and out of the harbour channel. Rat kings work the upper water column in the warmer months.
Baits and rigs: Drift with floaters or weighted paternoster rigs for snapper. Soft plastics or fish baits on the sandy margins for flathead. This is genuinely good plastics country because the bottom is forgiving.
Best time: Winter for snapper, spring through autumn for flathead, summer for the rats. Night sessions for mulloway.
An open question: there are local references to a “Boiler Wreck” somewhere near these marks. We haven’t been able to confirm it. There are scuttled wrecks off Newcastle reduced to little more than their boilers — the paddle steamer Commodore lies in 35 m about three nautical miles east of Nobbys — but that is several kilometres north of these positions. If you know the numbers, we’d like them.
14. Doctor’s Reef — 16.2 km
33° 14.30′ S, 151° 39.50′ E · 16.2 km from the Heads · 5.2 km offshore · 20–25 m charted
One of the premier snapper grounds on this part of the coast, and the most structurally dramatic mark in this article.
Where the northern marks are gentle gravel, Doctor’s Reef is rugged rock with real vertical relief — steep ledges, deep cracks and structure rising sharply out of the surrounding sand. It is a sticky bottom. Anchor carelessly or drift the wrong line and you will leave gear behind.
The rock is Triassic sedimentary — the Munmorah Conglomerate and Tuggerah Formation that outcrop along this coast at Norah Head and Frazer Beach. That matters practically: conglomerate and lithic sandstone weather into blocky ledges, undercuts and jointed faces rather than smooth boulders, which is what produces the caves and shadowed overhangs the bigger fish hold in.
The abrupt shallowing forces nutrient-rich current upward, and the upwelling drives the food chain that makes the mark what it is.
Target species: Snapper above all, and this is unweighted-floater-down-a-berley-trail country at dawn and dusk. Kingfish hunt the drop-offs and current lines — live yakkas or mechanical jigs. Big mulloway hold in the deep caves and shadowed ledges, best at night or on slack tide. Leatherjackets and morwong sit right on the rock face, and flathead patrol the exact line where heavy rock meets sand.
Baits and rigs: Berley and float baits for snapper. Live bait or jigs for kings. Heavier gear than you’d use on the gravel grounds, because a hooked fish will go straight for the ledges.
Best time: Winter and spring for snapper, summer for kings, night sessions for mulloway. Being 5 km offshore it needs a reasonable day, but it’s far enough out to be workable when the inshore marks are churned up.
15. Bird Island East — 16.4 km
33° 13.92′ S, 151° 36.28′ E · 16.4 km from the Heads · 1.6 km offshore · 10–18 m charted
The shallowest mark in this article, sitting where Bird Island’s underwater perimeter drops away into open water. Bird Island itself is a nature reserve about 1.4 km off the coast, rising to roughly 20 m, and it was part of the mainland until rising seas cut it off four to six thousand years ago. Its rock is the same Sydney Basin sedimentary sequence as the mainland headlands.
The seabed east of it is rugged shallow reef extension — jagged gutters, kelp beds and small rising pinnacles among sand patches. That broken ground breaks up the coastal current, traps nutrients and shelters bait.
It is highly exposed and the wash can be turbulent. That turbulence is what makes it fish, and also what makes it a mark to treat with respect. Shallow water, rock and swell is the combination that hurts people.
Target species: Snapper around the shallow pinnacles and broken rock — excellent for casting lightly weighted plastics or floating baits into the foam lines on a steady swell. Kingfish, mostly rats with the odd better fish, patrol the deeper edges and current breaks. Silver trevally and bream work right in the wash. Flathead on the clean sand lanes weaving between the reef clusters.
Baits and rigs: Light and mobile. Plastics cast into the wash, or unweighted baits drifted through it. Heavy bottom rigs are the wrong tool here.
Best time: A steady moderate swell is ideal — flat, clear water fishes poorly. Winter and spring for snapper, summer for kings. Avoid it entirely in big easterly swell.
Nearby: the Perch Grounds and Texas Reef both sit close by and are well regarded. They aren’t on the Marine Rescue list, so they’re not covered here, but they’re worth having if you can get the numbers locally.
16. The Steps — 17.5 km
32° 57.52′ S, 151° 45.58′ E · 17.5 km from the Heads · 0.5 km offshore · 25–30 m charted
Note the offshore figure. Despite being the second-furthest mark in this article by steaming distance, The Steps sits 500 metres off the beach. It’s a long run up the coast, not a run out to sea.
The name describes the bottom exactly. Low-relief rock terraces step down incrementally into the sand floor, creating mini-walls, cracks and drop-offs that trap marine growth, crustaceans and schooling bait. Coarse gravel fills between the terraces. It’s a distinctive formation and it sounds unmistakably once you’re over it.
Like the Dudley marks, it sits near the mouth of the Hunter and gets the benefit of that outflow.
Target species: Snapper — squire and pan-sized fish, very active on unweighted floaters down a berley trail or plastics worked over the ledge drops. Mulloway patrol the base of the steps, best at night, dawn, or slack tide. Sand and tiger flathead along the gravel fringe where the terraces flatten out. Silver trevally and morwong school tight against the vertical faces.
Baits and rigs: Work the faces, not the flat. Berley and drift baits down onto the terraces. Plastics hopped off the ledge edges.
Best time: Winter and spring for snapper, night sessions for mulloway, year-round for flathead.
17. The Perch Grounds — 18.1 km
33° 14.50′ S, 151° 44.50′ E · 18.1 km from the Heads · 11.6 km offshore · 55–65 m charted
The one mark in this article that isn’t on the Marine Rescue list, and worth the inclusion. Locals also hear it called Texas Wide, but that’s a different ground entirely — the real Texas Reef sits far to the south and well beyond the range of this series.
Finding it is straightforward on the plotter. Run east from Norah Head and look for where the flat 30 m bottom falls away into a 55–65 m basin. The coordinates sit right on that slope change, and that break is the mark.
The ground is an expansive area of deep-water broken reef. It takes the full push of the East Australian Current, which is both why it fishes and why it needs picking — when the current is running hard, holding bottom becomes the whole problem.
Target species: The name comes from the massive schools of ocean perch and red nannygai that carpet the bottom here. Snapper over the broken reef, and yellowtail kingfish through the water column — this is a premier jigging destination when the current lets you work it properly.
Baits and rigs: Heavy paternoster rigs with enough lead to hold in current, fresh squid and fish baits. Mechanical jigging for kings on the days the EAC eases. Electric reels earn their keep at this depth if you have one.
Best time: Fishes year-round given the depth. Pick your day on current rather than season — a slack period in the EAC matters more here than the month does.
Worth knowing: at 55–65 m, barotrauma is a real issue. Ocean perch and nannygai in particular come up badly. A release weight is essential if you’re returning fish.
18. Middle Reef — 19.1 km
33° 15.60′ S, 151° 42.60′ E · 19.1 km from the Heads · 10.2 km offshore · 45–52 m charted
A true deep-water reef and the furthest mark in this article both by steam and by distance from land. This is a settled-forecast, capable-boat proposition.
The structure is an extensive low to medium relief solid rock ridge rising from the surrounding deep sandy plain, cut by deep sand gutters, fissures and rocky shelves. Sitting well out on the shelf, it takes the full push of the East Australian Current, and that current over hard structure drives the upwellings that make it productive. The depth also means a stable, cooler environment, which is why it fishes year-round rather than seasonally.
Target species: Classic deep-water snapper ground — this is where the big mature knobbies come from, on heavy weighted paternoster rigs or drifted large strip baits. Kingfish use the ridge as a highway and respond to mechanical jigs and live bait. Teraglin are abundant, and they switch on from late afternoon into the night, feeding just above the reef. Red nannygai and thick silver trevally hold tight against the deeper shelves and gravel edges.
Baits and rigs: Heavy gear. Big strip baits, whole squid, live bait for kings. Jigs work well over the ridge. Sinker weight enough to hold in EAC current, which can be substantial here.
Best time: Fishes year-round thanks to the depth. Trag from late afternoon into the night. Kings in the warmer months when the current is running.
Worth knowing: at 45–52 m, barotrauma again matters for released fish. Carry a release weight.
Safety on this stretch
Log on and log off. Marine Rescue Lake Macquarie keeps a 24-hour radio watch from the base at Swansea Heads. Call them on VHF 16 before you cross the bar and again when you’re back in. If you don’t log off, someone comes looking — and if you never logged on, nobody knows to.
The Swansea bar is the most dangerous part of any of these trips. Not the marks, not the distance. The bar. It breaks without much warning on an outgoing tide against a swell, and it has killed people and sunk boats. Check it before you commit, and if it looks wrong, the fish will still be there next week.
Distance from the Heads is not distance offshore. Several marks here are a long steam up the coast but sit within a kilometre of the beach — The Steps is 17.5 km away and 500 m out. Others are the reverse. Plan fuel on steaming distance and plan your weather window on how exposed you’ll actually be.
The shallow marks are the risky ones. Bird Island East in 10–18 m and Red Ochre 700 m off the beach are lovely on a flat day and genuinely dangerous in swell. Shallow water, rock and a running sea is the combination that hurts people, not deep water.
Carry a release weight if you’re fishing the deep marks. The Pot Hole at 80–100 m, the Perch Grounds at 55–65 m and Middle Reef at 45–52 m will all give you barotrauma in released fish. Without a release weight, most of what you put back dies anyway, which makes the bag limit meaningless.
Check the forecast for the run home, not the run out. A northeasterly that builds through the afternoon turns a comfortable morning at Middle Reef or the Pot Hole into a long, wet slog back into it.
Useful links
- NSW DPIRD bag and size limits — including the mulloway boat limit.
- Bird Island Nature Reserve — the island’s geology and history.
- Munmorah Conglomerate — the rock forming the reef structure from Norah Head north.
- Using sea surface charts to find fish — for timing the EAC push at the Pot Hole, Perch Grounds and Middle Reef.
Next in the series
The Farm will get its own article — eleven sets of numbers across one ground eight kilometres wide, and a distance column that can’t be trusted. After that the series switches to sorting by distance offshore rather than distance from the Heads, which is the more useful number once you’re past the close-in grounds.
Positions sourced from the Marine Rescue Lake Macquarie fishing matrix and reproduced with their caveat: not for navigation. Distances recalculated from coordinates. Log on with Marine Rescue Lake Macquarie on VHF 16 before you cross the bar, and log off when you’re back.

My husband has been raving about these marker. He has been fishing off Lake Macquarie for years and some of these he has never even heard about. Two trips using this guide has produced probably the best catches in years…
Tx for the great feedback Anna. Glad my markers worked for your husband. Nothing like coming home with ‘Catches of the Day.”